Fly it! Optimizer (the basics)
Set it up
Before you use Optimizer, you'll want to customize it to suit your needs. You do this using its Preferences dialog box. To access Optimizer preferences, click the Preferences icon on the Optimizer toolbar. It looks like this:
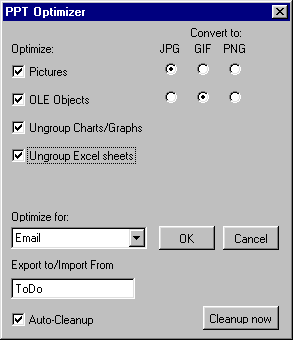
Or from the main menu, choose PPTools, Optimizer, Preferences. Either way, you'll see this dialog box:

The Optimizer Preferences dialog box
Optimize: Choose whether or not to optimize various types of graphics and other presentation content.
Convert to:When you choose to optimize pictures and OLE objects, you can pick the graphics format Optimizer will convert them to, JPG, GIF or PNG.
What's the best format? That depends on the content of your presentation:
- Choose JPG or PNG if you have a lot of continuous tone photo-type images. JPG will give you smaller PowerPoint files, but PNG will give higher quality images.
- Choose GIF or PNG if you've used mostly flat-color business-type graphics (ie, charts, images with text, etc.). Use PNG if there are many colors or gradients in the graphics.
Optimize for: This is where you tell Optimizer how you intend to use your presentation. In other words, how aggressively you want it to shrink the images in it.
Here's what the various options do and why you'd use them:
- Tiny/Ugly - The description says it all. It turns the images jaggy, nasty, ugly ... but very, very small. You wouldn't ordinarily use this on "real" presentations, but suppose you're passing a presentation back and forth over email among team members. They all know what the company logo and all the product photos look like so they don't need to see high resolution images of them. Ugly little postage stamp images will be fine. And a file that's a tiny fraction of the original version will make email a lot smoother. Remember: Optimizer always works with a copy of your presentation. The original is untouched.
- Web - Optimizer assumes a final size of 500 or so pixels across and resizes your images accordingly. This helps keep the presentation size small enough to download over the web but still retains reasonably high quality images.
- 640x480, 800x600, 1024x768, 1600x1200 - Choose one of these options if you'll be giving your presentation on your monitor or laptop, or on a video projector hooked to your computer. Match your choice to the resolution your computer runs at. Optimizer resizes your images for maximum quality at these display resolutions.
- 600dpi Printer - Optimizer maximizes quality for output to desktop printers
- 133lpi and 200lpi press - Optimizer maximizes quality for printing presses
- 35mm slides at 2k, at 4k - Optimizer maximizes quality for 2k/4k film recorder 35mm slide output
The further down the list, the higher the resolution, the higher the image quality and the larger the Optimized PPT file will be.
Hint: When in doubt, set it at 1024x768 and forget it.
Export to/Import from: The folder where you want Optimizer to store its intermediate files.
AutoCleanupShould Optimizer automatically delete its intermediate files or not. Usually you'll want to leave this checkmarked. Occasionally it's handy to be able to check the intermediate files for troubleshooting and other purposes. Click Clean Up Now to delete all intermediate files immediately.

